From French Bakery to Film Noir: How I Created a Sin City-Inspired Render
Final Noir Render / Sin City Look using RenderMan stylized Looks
Ever wondered what a charming French bakery might look like through the gritty lens of a graphic novel? In this breakdown, I take you behind the scenes of my Sin City-inspired take on the French Bakery scene—originally created by Marion Machelard, Emma Siret, and Céline Soubrane.
This piece was built entirely in RenderMan for Maya, using Pixar’s Stylized Looks system. It focuses specifically on the Artistic Toon feature within the PxrStylizedControl node. I’ll walk through how the look was crafted—from assigning shaders, scripting light rotation, and copying ramp settings, to fine-tuning toon ramps and layering linework and hatching effects through display filters.
Whether you're exploring stylized rendering for the first time or looking for ways to speed up your workflow, this project highlights several tricks and techniques that made this moody noir look come together.
Let’s start by breaking down the scene setup and where you can download the assets to try it yourself.
Note: The current look and workflow is doable in RenderMan for Blender, Houdini and Katana. They will all produce the same result if you follow the shading technique. The only difference between this Maya workflow and Blender, Houdini and Katana is that the custom scripts that were written by myself to speed up the workflow are not present in these other packages, so expect delays when you are trying to work with a 102 individual surfaces and tweaking them one by one.
At the end of this article I'll post a single script that was made for blender that will provide the same functionality of linking a light rotation to an Artistic Toon. In fact it's functionality is better than the one found in Maya. So scroll all the way down if you want that part of the script.
We will begin by navigating to the RenderMan website to download the default scene project file. Once you have the file saved on your device, open it in your preferred 3D software. Make sure to take note of the settings displayed in the original scene.
As you dive into the scene, you may wish to explore the Noir version I've provided. This alternative will serve as a useful comparison to help you understand the modifications made. Remember to pay attention to the specific settings and adjustments I utilized in the Noir version; these insights can guide you through any challenges you might encounter while working on the original scene. You can download the Noir version at the end of the article.
Let's proceed by downloading the original scene and open it for further exploration.
In case you are wondering what the original scene looks like in all its final render glory, it showcases a meticulously crafted environment with intricate details that highlight the Artists commitment to quality.
Original Beauty Render of the French Bakery
We need to optimize the scene for Stylized Looks toon shading and lighting. Follow these steps
Hide All Additional Lights
In the scene, locate all light sources excluding the main sun light. This includes point lights, spotlights, and area lights.
Access the outliner and selectively hide these lights by toggling their visibility. Ensure that you do not delete them; simply change their visibility settings.
Save this modified scene as a new file to preserve the original setup.
Hide Volumetric Objects
Navigate to the outliner and locate the
globalVolumeAggregateset.Select all volumetric objects grouped within this set and hide them to simplify the scene as per the requirements for the Artistic Toon setup.
Hide Glass Panels
Identify all glass objects within your scene.
Select these glass panels and hide them using the same method employed for the lights and volumetric objects. Their presence will interfere with the desired stylized look.
Adjust Render Settings
Open the render settings panel.
Set the Max Indirect Bounces to 0 to prevent indirect lighting from affecting the scene.
Adjust the Specular Ray Depth and Diffuse Ray Depth to 0 to enhance the efficiency of the rendering process and ensure the stylized appearance is maintained.
By following these steps, the scene becomes optimized for a stylized look while retaining all original elements for potential future adjustments.

RenderMan Render Settings for Stylized Looks
At this stage save your new scene with a new name and do a test render.
The original Beauty Render with only a distant light and our Stylized Looks render settings
If your render matches the above image then you are all set to progress to the next stage where we start to attach PxrStylizedControl to all our visible objects.
RenderMan provides a convenient method for applying a PxrStylizedControl node to any selected object or Pixar Surface that supports a utility port. The utility port serves as the connector between the PxrStylizedControl and the shading mode. While PxrSurface supports this port, PxrConstant does not, though this is understandable, as it is meant to be a constant surface without varying attributes.
To attach the PxrStylizedControl automatically, simply use the button located on the RenderMan shelf. This button is represented by an icon resembling a drawing sphere. However, before proceeding to apply the node, it’s advisable to review all necessary adjustments and settings.

RenderMan Shelf and location of the Attached PxrStylizedControl button
When you hit that button in a new scene with an object or surface selected, here’s what goes down:
A
PxrStylizedControlnode gets attached to the selected object's surface under Utilities Patterns.This connection becomes the Result AOV.
Stylized Tools are switched on in the render settings, and at least one
PxrStylizedHatchingdisplay filter is added to your filters list.
If you click the button again on more objects, it just attaches another PxrStylizedControl node each time, skipping the first two steps.
To make handling multiple surfaces easier, especially since clicking through the viewport can be a hassle, you should gather all your PxrStylizedControl nodes in a separate Hypershade tab. Here’s how to simplify things:
Open Hypershade and create a new empty tab.
If your layout looks like mine, you probably keep the browser panel closed. When you’re dealing with a lot of nodes, pop it open for better access.
Tweak your layout as needed to fit your workflow and navigate Hypershade easily.
This efficient setup will save you time and help you handle your nodes without a hitch.
Workflow for Attaching PxrStylizedControl for a Hundred Object
The empty Hypershade tab will collect all your created PxrStylizedControls in one place, making your workflow smoother by cutting out unnecessary connections. This step is important for the next stages of your project. Sticking to this method can speed up the overall creation process, but it's not a must for a standard Stylized Toon workflow.
In the image provided, you'll see one of the surfaces selected with the Attribute Editor open on the right. If you scroll down, you'll find the Utilities Patterns section. When you select another surface that can connect to the relevant port, the Attribute Editor will automatically highlight the node with Utilities Patterns, so you won’t have to scroll again. This feature helps you quickly check if the script can run on that surface.
To move forward, go through the Materials list step by step. Select each surface and check if there’s a Utilities Pattern in the Attribute Editor. If it’s there, just click the sphere in the shelf and go on to the next surface. Skip any surfaces that don’t have a Utilities Pattern. You can tell if a PxrStylizedControls is attached by looking for the new node in the Hypershade tab, where the Utilities Pattern will light up in yellow.
Adding the first PxrStylizedControl to an object
So, you might be thinking, why didn't we just slap one PxrSurface on everything and call it a day with a single PxrStylizedControl for that two-color cell thing? Sounds way easier, right? Well, the problem is, all the objects have different shapes and stuff. What looks cool on a Baguette will just be solid black on a sunny tabletop, and the other way around, what works for the tabletop will be totally white on the Baguette.
Think of the tabletop and Baguette – the scene's got all sorts of different objects with their own unique shapes. If we treated them all the same, it'd look super boring and flat. We're just trying to speed up the tedious stuff, like setting up the shaders and connecting the lights... not trying to skip the part where we actually make it look good. That still needs someone to take a look at each thing and tweak it.
Once you’ve finished all the surfaces, you’ll find a tab containing all the new PxrStylizedControls. To make things clearer, I’ve placed the first one, called PxrStylizedControls1, all the way to the left, on its own. This node will act as the base for setting up the basic Artistic Toon settings, and I’ll copy these settings to the other controls afterwards. This way, your workflow will be smooth and everything will stay consistent throughout your project.
The result of attaching 102 PxrStylizedControls to the scene
By now we should have 102 Surface connected with a PxrStylizedControl node. If your count came shorter than that don’t sweat it, we’ll have time to correct these as we move on.
Note: Our next step is create the look we are after, there is no need to create start by turning the RenderMan viewport or have an IPR render running while we perform the next two steps, because there is nothing to see, this will be another exercise of mass assigning and setting attributes for every PxrStylizedControl node.
We’ll begin by downloading a version of the scripts from the repo provided below
If this is the first time you are visiting github and have never downloaded from this before, don’t worry. All you have to do is click on the green button labeled <> Code and from the menu that appear selecting Download Zip.
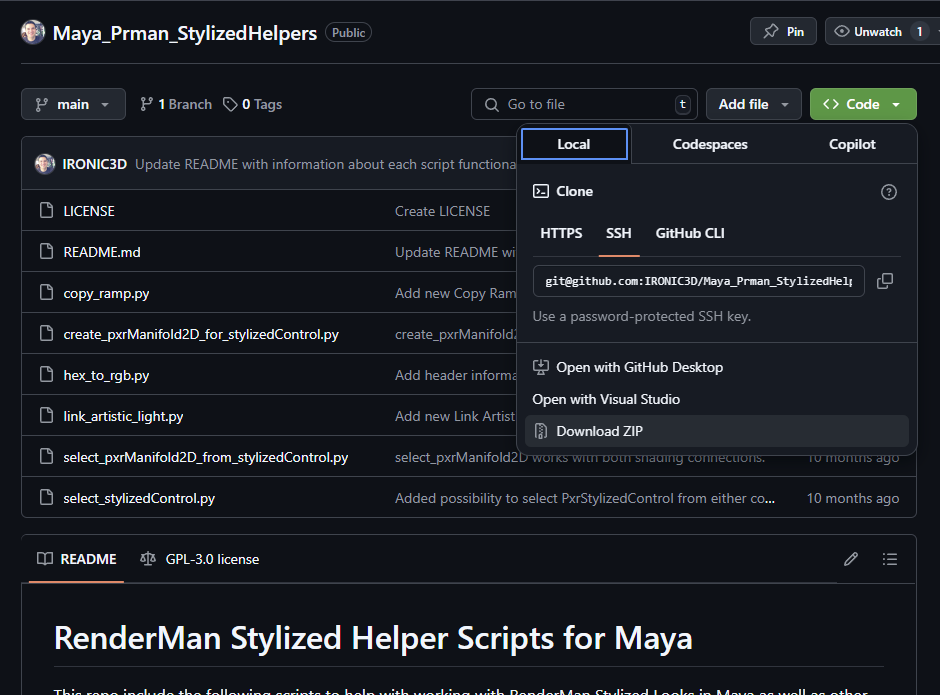
IRONIC3D Maya PRman StylizedHelpers scripts at Github
There are 6 scripts in total in the repository, you don’t need all of them for this project, although nothing is stopping you from installing all of them if you find them useful. Here is a run down what each script does:
The scripts are divided between general Maya scripts, these scripts will work across several render engines. Usually with RenderMan, 3delight and Arnold rendering engine. Which are the ones I normally rotate in using.
Then we have RenderMan Stylized Looks specific scripts. I highly advise installing these. I have them on a shelf and assigned to a marking menu. You can assign up each one to a hotkey for even faster workflow.
General Maya Shading Helper Scripts:
Hex to RGB: This script allows you to apply a hex value to a diffuse channel of a RenderMan, 3delight or Arnold surface
Copy Ramp: This script allows you to copy only the ramp gradient from one node to another without needing to save the ramp as a preset. This works really well with shading where the ramp is one of a dozen other attributes and you only want to copy the same initial values from one node to another. Works with RenderMan, 3delight, Arnold and Native Maya ramp nodes, which happens to be the nodes supported by RedShift for Maya
RenderMan Stylized Looks Helper Scripts:
Create PxrManifold2D for PxrStylizedControl: This script will allow you to select an object that has a PxrStylizedControl shader attached and it will create a PxrManifold2D node to it's Texture Coordinate port
Select PxrManfold2D from PxrStylizedControl: This script does what the name implies. Selecting an object and executing the script will select only the PxrManifold2D node that is attached to the PxrStylizedControl node. Often times when I'm shading using the PxrStylizedHatching node I tend to set the hatching mapping to Texture Coordinates. Which allows the hatching to attach to a UV coordinates if I have attached a PxrManifold2D node into the PxrStylizedControl. When that happens and there are a dozen objects in the scene, the only way to unify the scaling of the UV frequency/repeat is by modifying the PxrManifold2D node for each object. This is a fast and streamlined way to just select that node and start editing those attributes without needs to open the Hypershade and select the node manually.
Select PxrStylizedControl: This is similar to the node above, in that it is a fast way to select the attached PxrStylizedControl for any object to start tweaking those render values from within the viewport without the need to open the Hypershade and select the node manually.
Link Artistic Light: This script will allow you to select any RenderMan light, and a PxrStylizedControl and it will create an expression linking the light rotation to the Artistic Toon light rotation.
Open up the script editor and open each script from the File > Open Script menu option. Once loaded, you can click the Save Script to Shelf as indicated in the image below
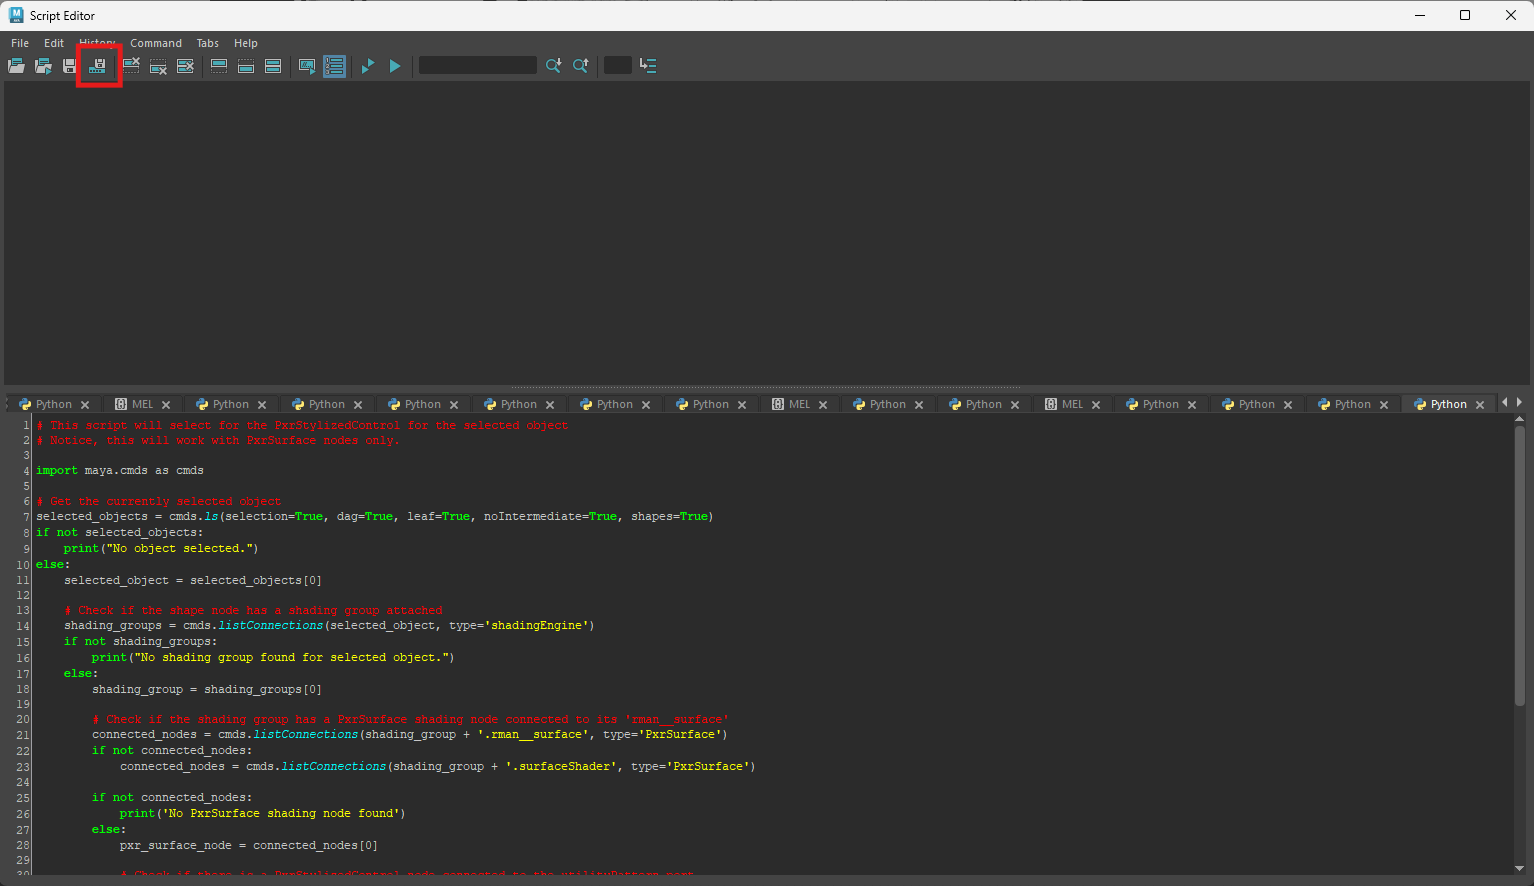
Saving a Maya script to the Shelf
Repeat this process for the remainder of the other script.
Once all scripts are saved on a shelf you are ready to go. If you want to get faster access create a marking menu for these scripts and assign the marking menu to a hotkey. Or you can assign individual hotkey to each script. The choice is yours. Going over how to accomplish setting up the marking menu or hotkeys goes beyond the scope of this article. There are plenty of guides online on how to do that.
I have set mine on a custom shelf and assigned custom icons obtained from Icons8.com for each one.

IRONIC3D Custom Stylized Looks Shelf Icons
Each script was then added a marking menu and the marking menu was assigned a hotkey as below:
IRONIC3D Scripts on a Marking Menu
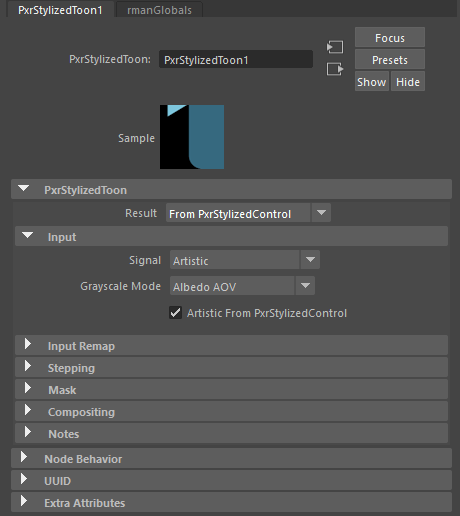
Usually when working with Stylized Tools to setup the cel shading we would use the PxrStylizedToon display filter. This is a global filter that will affect all the materials in the scene where PxrStylizedControl is attached to its surface.
If you want to get a quick Noir look you can set the signal to be Artistic , the greyscale mode to Albedo AOV (so no diffuse shading is involved and the signal will be cleaner). Set the Artistic Shadow to Color and set the stepping to Color Ramp and add the desired ramp colors and placement.
Basic PxrStylizedToon for achieve Noir Effect for the entire scene
With this approach you don’t really need individual PxrStylizedControl for each surface, you could have gotten the same result by mass assigning every object in the scene to a new single PxrSurace and attached the PxrStylizedControl to that surface. The result below would have been the same either way.
Result of adding Noir Effect on a global PxrStylizedToon display filter
If the above result appeals to you then you are my type of person. It is definitely useable and has its own charm. But there are a few issues that doesn’t make it Sin City style but rather gritty noir.
There is a lot of black, especially in areas we wouldn’t expect to or want to do. I referred to this earlier as Table Top vs the Baguette. The Baguettes in the background are almost washed out with no definition but the table top is almost black, so is the floor. And if we were to adjust the color ramp to make the table top and floor lighter in direct lit areas then we’ll loose the Baguettes all together.
There are greys introduced in the images, mainly around the shadow areas. This is normal and fixable. The distance light we choose as the source of the light and shadows for our scene has Angle Extent set very high, to 0.750 from the default which is 0.053. By lowering it to the default value we’ll get back our sharp shadows.
This approach of globally setting the color ramp of the scene will not work for our purposes and we’ll need to work on a granular level. Pixar team introduced the Artistic Toon in v26 as a response to this use case. It shifts the shading from the global signal which affect all objects to the individual surfaces for each object. This mimics the toon shading workflow from other render engines where they provide a toon material. In RenderMan those controls are located in the PxrStylizedControl node, so still non-destructive workflow.
But the Artistic Toon goes beyond the typical toon ramp typical in other render engines, it add a heap more customization options. How customizable? Individual light direction and rotation for each surface…and shadow casting color.
PxrStylizedControl Artistic Toon Light Rotations Menu
If you look closely at the attribute editor image above you’ll notice a purple field boxes in the light rotation attribute. This is to indicate that there is an expression in each of these channels. By default the Artistic toon defaults to a Light Rotation Space of Degrees 0..360 but the light rotation channels are <0,0,0> . They are not linked to any light in the scene and in-fact the Artistic Toon in the PxrStylizedControl node is not aware of any light in the scene and are not lit by any light in the scene. Artistic Toon can only be lit through the node itself, and the direction of the light is set through this attribute windows. For each material in the scene.
The fact that Artistic Toon doesn’t recognize or is linked to any light in the scene is a point of contention. It does require more setup from the Artist part and if there are more lights in the scene that the we want to affect the surface then we’ll need several PxrStylizedControl layered in a clever way. Which is another involved step.
But these are not limitations at all, as involved as they are to setup, they provide much more freedom and control after the fact. Something that cannot be said with Toon materials typically found in other render engines.
The custom light rotation solves one of the biggest issues in toon or Anime shading specifically. If you have a character in the scene and the important features in the face are in shadow because of the main key light direction in the scene then you as the artist are in a lot of trouble to try to resolve that. There is no easy solution to that problem that doesn’t involve the words AOVs and Compositing…lots of compositing. And this is a very common case in toon rendering. Toon rendering doesn’t and shouldn’t adhere to the real laws of physics in photorealistic rendering. changing … or more commonly cheating … where the shadow areas are for each object in toon rendering is a common practice. This is dead simple to resolve in Artistic Toon.
You have more than one light in the scene that you want to affect the lighting of your objects. In reality that is a dreadful scenario. The amount of cross banding/stepping that each light will contribute will look ugly at best. Plus the overlapping shadows and having to change the overall light contribution to an already approved key light values. If you want a fill light from the opposite direction, create another
PxrStylizedControl, set the color ramp to your liking, and it doesn’t need to be stepped, which is cool, and it doesn’t need to have shadow, which is cooler. And then you can blender it on top of the mainPxrStylizedControlusing any blending mode that you deem fit. Just think of how easy it will be have a rim light with this method, or multiple rim lights, and a rim light that goes beyond a single slider to control, but an actual range and direction and blending mode.
Ok, enough of me trying to sell this feature. I promise you I am not a sales rep for RenderMan 😅
As a first step we need to link our keylight to each PxrStylizedControl in the scene. The link happens through expressions as this is the only way to get the rotation to actually follow the light rotation. This is true as well for Artistic Toon in Blender, as the rotation channels will need to be converted to Eular values before assigning them to each channel. Something that cannot be done by simply linking the rotation channels to the light rotation angles. Obviously this is a very time consuming process, as an expression will need to be set with the appropriate conversion from Quaternion to Eular and setting the mode on each channel. And we have 102 PxrStylizedControl nodes by my count. We need a script to speed up the process.
The Link_ArtisticLight.py script does exactly that. You can run the script once and use a UI to link any light to any PxrStylizedControl node.
Maya Layout for setting up Light Link Rotation to every PxrStylizedControl Artistic Toon light rotation.
The way I have it setup is I execute the script once. This will open the UI for the script. I choose the light and press the Select button in the GUI next to the Light Name field. The result is the name of the light will be extracted and populate in the Light Name field. Then I would change the outliner by removing the checkmarks from the Display menu for DAG Objects Only and Shapes. And then typing PxrStylizedControl in the text field above the outliner, this will filter all the nodes that starts with PxrStylizedControl.
From there the process is simple. I select each node from the outliner, pressing Select next to the Shader Name. Click on create expression and then pressing the enter key to dismiss the dialogue pop up. Then select the next node and the one after that and so on and so forth until all PxrStylizedControl nodes are linked to the light source.
Within a minute or two you should have all those 102 PxrStylizedControl linked to our keylight.
The next and final step in our shader setup is setting up the two tone ramp on each PxrStylizedControl. Again this is a repetitive process that can be easily automated. Easiest solution is to set one PxrStylizedControl color ramp properties and then save it as a Presets. Click each PxrStylizedControl in order and load the preset.
The issue with this approach is that every other attribute will be replaced as well, and that might break the light expression. So the solution is to use the copy_ramp.py script.
This script is similar to the Link_ArtisticLight.py in how it executes, instead of a Light Name it has a Source Field.
Maya Layout for setting up Copy Ramp between PxrStylizedControls.
The way I had it setup for my workflow is similar to the light linking process, The outliner is still visible and filtered to the PxrStylizedControls. I set the color ramp for the first PxrStylizedControl in the list. It doesn’t need to be accurate or visually inspected. The only thing we care about is having two zones set to stepped. Black in one end and pure white in the middle. Make sure the white is full white and not off-white as is the case with RenderMan defaults.
Once setup I choose Select Source from the script UI to place that node as the source for all PxrStylizedControl nodes, and then select each PxrStylizedControl in the outliner, press the Select Target and click the Copy Ramp to Target button in the UI. Select another PxrStylizedControl, press Select Target and execute the script.
Within a minute or two you should have all those 102 PxrStylizedControl all having a similar Color Ramp attribute.
I know, I kind of said the previous step was the last one…I’m sorry
This step is easier actually, and it will require 3-4 clicks to set it up for all the PxrStylizedControls in the scene all at once. And who knows, you’ll learn a new way to mass change attributes in Maya in the process
You can select all the PxrStylizedControls from the outliner or since I have them laid out in a tab in Hypershade, then I just box select all of them. With them selected, make your way to Windows > Attribute Spread Sheet. There is a filter field at the top left of the new pane that showed up. Type shadow. This will filter all to all the attributes that have Shadow word in them. We are interested in the Trace Shadow column. select the first field that says off and drag select all the way down to the last that says off in the list. Type 1 and press enter. Now all the PxrStylizedControl have trace shadow on.

Maya Attribute Spread Sheet for Modifying PxrStylizedControl
The Attribute Spread Sheet panel is a great way to deal with mass object editing. Any property in the attribute editor is accessible through this panel and be set in bulk. It is a great time saver.
Alright, we’re done with the setup. Next we’ll start an IPR session and start tweaking those ramps to the desired look we’re after.
We still need a PxrStylizedToon to display our Artistic Toon. There are other way to do it without, but that is a topic for another day.
Open the Render settings and make your way to the Features tab. The Enable Stylized Looks should be turned on. And the Display Filters[0] field should have a PxrStylizedHatching node attached to it.
You can keep that node or delete, either way works. But if you decide to keep it, you can press the M on far right of the field to mute it. That alone should suffice.
We want to add a new PxrStylizedToon display filter. So next to the < button there is a gear icon. Right click on that gear and Append a new display filter.
A new empty field will appear below the existing PxrStylizedHatching. Right click in the middle of that newly empty field and select PxrStylizedToon.
Personally I like to order my Stylized Looks display filters. Usually the top ones are reserved for PxrStylizedToons(plural). If you want to rearrange the order click the gear icon next to the new PxrStylizedToon and press Move Up. This will move the PxrStylizedToon above the muted PxrStylizedHatching filter.

Default Stylized Looks Display Filter arrangement
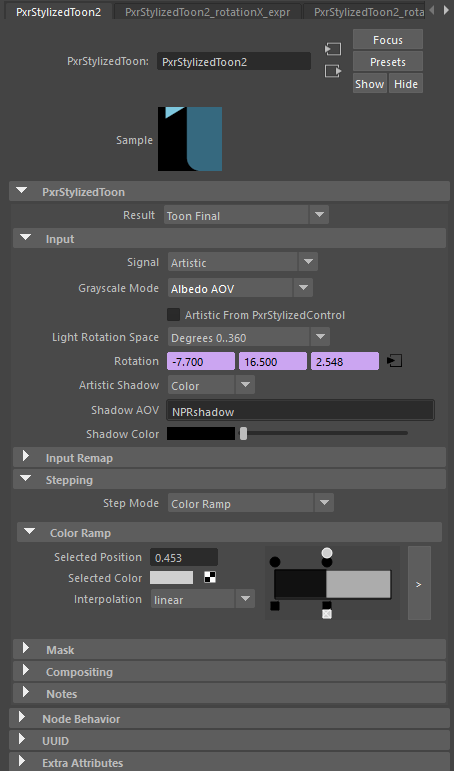
PxrStylizedToon settings to read from PxrStylizedControl Artistic Toon
Here are the attributes you need to setup to have the Artistic Toon render.
I’ve set the result to be from PxrStylizedControl. Meaning show me only the NPRtoonOut AOV that is generated from the Artistic Toon in PxrStylizedControl.
This will ensure that no other shading is present and we’ll only get the pure two color ramp we’ve set.
As input I’ve also set the signal to be Artistic and activated the Artistic From PxrStylizedControl.
What those choices mean is look at the Artistic Toon Signal, and then read the NPRtoonOut AOV data from Artistic mode in PxrStylizedControl for greyscale stepping. Then apply Toon color modes here in PxrStylizedToon display filter.
The resulting true colors of our Artistic Toon color ramp will be written to the NPRtoonOut AOV. If we don’t change the Result from Toon Final to from PxrStylizedControl then the stepping will be applied to the Albedo AOV and the results will be greyed out. We want to the pure color ramp, so setting the result from PxrStylizedControl will ensure we get the pure colors without any averaging or blending with another AOV signal. Think of it like a constant output.
Once the PxrStylizedToon display filter is setup as the above settings you can start an IPR session. You can close down the hypershade and outliner. We only need a viewport and the attribute editor to tweak our shaders from here on.
The way I had it setup to tweak the color ramps for each PxrStylizedControl is splitting my view in half, Perspective view on the right, and this is where I have RenderMan IPR activated. And another perspective view on the left. The distant light was brought in view. This view makes it easier for me to move around and select object. The main perspective is get close to the objects and show me the result, and I alternate between the perspective and main camera view as I need.
But how do we easily show the PxrStylizedControl Artistic Toon controls from this view? Remember the Select_PxrStylizedControl.py script? I have it mapped to a hotkey. I select an object in the viewport and press the hotkey, the PxrStylizedControl shows up in the attribute editor. And if I have a previous PxrStylizedControl in the attribute editor scrolled down to the Artistic Toon Color Ramp, then any PxrStylizedControl that I call will have that color ramp property open ready for editing.
Maya Layout for color ramp tweaking in the viewport
Go through each object in the viewport and adjust the position of the white marker in the color ramp to show more of the shadow areas or less off. There is no right or wrong setting here, it is entirely up to you. If the black and white shapes becomes too much to judge for you, switch the perspective panel to the render camera view to see how they all fit together in the final render. the resolution is small and hard to judge, fire up an IPR in ImageTools.
For myself I cheated a little bit. Taking the Baguette as an example, there are 3-4 types each with their own PrStylizedControl. I would set one color ramp to my liking and then fire up the copy_ramp.py script, using the select_PxrStylizedControl.py script for source and target I would copy similar ramps and still tweak if I see room for improvements.
Once you’ve gone through all the surfaces and are happy with the look jump on the next section to add the lineworks.
We’re almost there. My Artistic Toon final result looked the following:
Final Artistic Toon result after all the tweaks.
It looked ok for my purpose. I wanted details in the center of the image whilst the rest of the psalteries does looks washed out. Those details are going to be brought back through linework.
Note: If you've nocticed that I had scribbles on the cards infront of the bread produce and you don't it is because we haven't addressed that part yet. Once we apply our hatch filter I'll show you to bring those details from the original texture.
Using the same workflow as adding the PrStylizedToon display filter, add a new display filter and associate with a new PxrStylizedLines display filter. This filter needs to go to the bottom of the list.
All the settings you need to have the same result as I have in my render is shown here. I’ll go through the important parts briefly below.
Explaining those attributes in detail goes beyond the scope of this article. I am launching Learn RenderMan Stylized Looks in one Weekend course that goes through every settins and explain how to use them. It is not a manual type of course, instead it gives practical explanation these controls are used when to use them.
The type is set to Curvature. Meaning look at the Curvature AOV and use that as a basis to find lines.
The activation of the Bell Curve is set to sigmoid, which I can have a sharpness slider set to 50, which is pretty high, and an offset set to 0.3 which makes it bread when searching for a line.
The Line Detect Multiplier set to to 3.0 and the Gamma to 2.0
Line thickness is set here to 4. This is because my final render render is at 4K, which is 4x times the initial value of 1 when rendering in HD. So if you are working in HD at 1080p, keep the Thickness to 1.
Line Thickness Remap have the by PxrStylizedControl activated, this indicate that I’m going to be tweaking the thickness for individual objects as I see fit as I’m working, so be prepared to read the value from there. The default for the Line Thickness in PxrStylizedControl is 1.0 which act as a multiplier to the value we set in the PxrStylizedLines.
For Input I’ve switch to Custom AOV and I am reading the NPRtoonOut. The reason I did so is because I want a clean input signal for the line detection. Default is diffuse which still reads the diffuse data even though we don’t display it.
PxrStylizedLines settings to achieve a Sin City Linework
If you look at the final rendered image you’ll notice that objects that are in direct lit areas have black outlines, and objects, or even part of objects, that are in dark areas have white outlines. This type of effect is a hallmark for Sin City comics. And is dead easy to achieve in Stylized Looks. Keep the line color to pure white. We’ll tweak it based on Light and dark areas. I’ve set the Light Tint to be HSV Light Dark In this case I could have gone with Lien Color Shadow as well, both will give me the same result.
for HSV Light everything is set to <0,0,0> and for the HSB Dark is they are set to <1,1,1>. In reality it could be <0,0,1> as well since that would give pure white.
If you switch the Result to showcase the line alpha it will display the linework across the whole scene as so:
PxrStylizedLines Line Alpha AOV for the Sin City Style Linework
While the Final Lines result will show the actual resulting colors of the linework, which shows the difference between white and black areas.
PxrStylizedLines Line Color AOV for the Sin City Style Linework
At this stage the linework is complete. However when you do a test render you’ll notice some line are fading away and barely visible (e.g. the door at the far right) and some line width are too bulky and big (e.g. the pastries on the left display) In the line image above I have those modified already for myself. I’ve selected the door in the viewport and queries its PxrStylizedControl using the select_PxrStylizedControl.py script. Expanded the AOV Data DisplayFilter and then Lines. There you’ll find the Line Thickness property. For the door I’ve gone up as much as 3.0, and for the pastries on the left I went to 0.30.
Spend as much time as you want here to get the desired line thickness you are after. When you are ready jump to the next section to add the halftone filter to our scene.
We only need one PxrStylizedHatching display filter to achieve the halftone effect, and we want to add it before the PxrStylizedLines. This is because I don’t want the halftone to have any effect on the line colors. I want the white line to stay white.
All the settings you need to set it to have the same halftone affect as mine is shown on the image below.
Most of the settings were left at the default, including the signal and mode. As well as the Projection, which is set to Screen.
The first change was selecting the Halftone from the Texture Set.
Then I wanted to a distance based scaling which is why I’ve chosen Camdist Range as the Frequency Mode and why the Camera Range is activated. These values were taken from ImageTools by looking at the Blue channel of the NPRlineNZ AOV, I lowered the Exposure and Gamma quite considerably to see a resemblance of a z-depth of my scene. Then moving the mouse over the wall and read out that value from the ImageTool pixel readout bar and also moving it to the closed object. For me those values read 380 for Z Min and 740 for Z Max.
Now, I ended up having a matching Z Min Hatch Frequency and Z Max Hatch Frequency. This is because the gradual frequency built up between the min and max was causing a Moiré effect. with a Z Min and Z Max frequency matching I could have switched back to a Mode of 1 Value for the frequency and set it to 7 as I did here, but at this stage I was getting tired and having to do more clicks just because it is the right thing to do wasn’t an option 😅
The Halftone filter settings used in Sin City style effect
The last setting to sell this effect is to lower the Mix setting in the Compositing tab ever so slightly. At 1 the effect is very noticeable. going down to 0.950 had the effect show up on certain areas which is what I was after.
The following image shows the NPRhatchOut AOV halftone texture alone over the diffuse channel. Remember we kept the signal to Diffuse, which is why se the halftone over the what looks like the diffuse channel. And it is also what gives gradation effect to our halftone when rendered with our final scene. AOVs are the magic sauce in Stylized Looks.
NPRhatchOut AOV showcasing the pure halftone display filter
And that is it, you are done. Congratulations on your first Dark Noir/Sin City effect made with RenderMan Stylized Looks.
You know hove all the tools you need to create the next Sin City movie or comic.
But wait, what about the scribbles on the cards, how do we bring those back? On to the final section.
Getting the prices show up on the cards or the wall frames with Artistic Toon is actually quite simple, and it is a testament to the flexibility the Stylized Looks developer have put into into Artistic Toon.
In PxrStylizedControl Artistic Toon Color Ramp, you can, in-fact, attach a texture to any marker color.
Adding a texture to an Artistic Toon color channel in Maya for Stylized Looks
I’ve taken the same texture that is plugged into the diffuse channel of the PxrSurface for the cards and plugged it into a PxrThreshold, I wanted to have a sharp black and white colors and PxrThreshold is a great node for that. The trick is lower the threshold, which is texture dependant. I had an IPR running while I was moving the threshold back and forth. I’ve also set the PxrThreshold to Invert. The result of the PxrThreshold is piped into the Color Ramp[1] color, which is the white marker in the Color Ramp.
I could have another PxrThreshold that is assigned to the Color Ramp[0] color, which will affect the dark areas (that would be a cool effect). However since the object that have this texture are flat, then they will ever have a black color if they are not facing the light (I didn’t do the same for the prices on the left or right display, just the front, so no need to for my own needs) or if they are in shadow areas. And if they are in the shadow area then they will be pure black regardless, this is because the shadow goes over and color and turn it into black.
PxrThreshold settings for adding Noir Textures
Congratulations, you are done. You can now turn any scene into an original Sin City look.
You can spend as much time tweaking the settings as you see fit. But they all follow the same process as before, your are either tweaking line thickness per object or adding textures to show up in lit areas or dark areas. The Choice is yours how much time you want to spend into it.
There are room for improvements of course, mainly adding bump for those extra details. These are not complicated to setup. I didn’t go through adding them in this scene because I couldn’t see the benefit visually, The bump maps were not designed for linework work so adding them kind of ruined the look I was after. I’ll leave that implementation for your to experiment and figure out, but I’ll give you a hint. It will require another PxrStylizedLine display filter type set to Sections. 😊
If you want to download the final project with my settings that are setup for 4K render you can render the same from the link below.
Note: Make sure you download the original scene from the RenderMan site. Then unarchive this scene and place the scene in the scenes folder of the original project. Set your Maya scene to the FrenchBakery folder and you can open the scene without any issues or missing assets.
If you’re excited to get hands-on with Stylized Looks and want a practical, no-fluff way to learn it, I’ve got something for you.
I’m launching a new course:
🗓️ “Learn RenderMan Stylized Looks in One Weekend”
This course is built for artists, hobbyists, and TDs who want to:
Understand the core concepts (without getting lost in the docs)
Build your first stylized renders using real-world examples
Learn the power of AOVs, LPEs, and brush-based stylization step by step
👉 [Sign up here], and be notified when the course is launched.
And if you have thoughts, questions, or cool examples to share, drop them in the comments or reach out to me directly. I’d love to see what you create.
